Setting up the Ultimate Camera Trap
The Ultimate Camera Trap
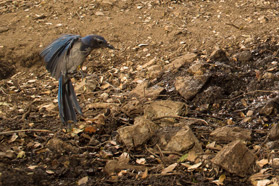
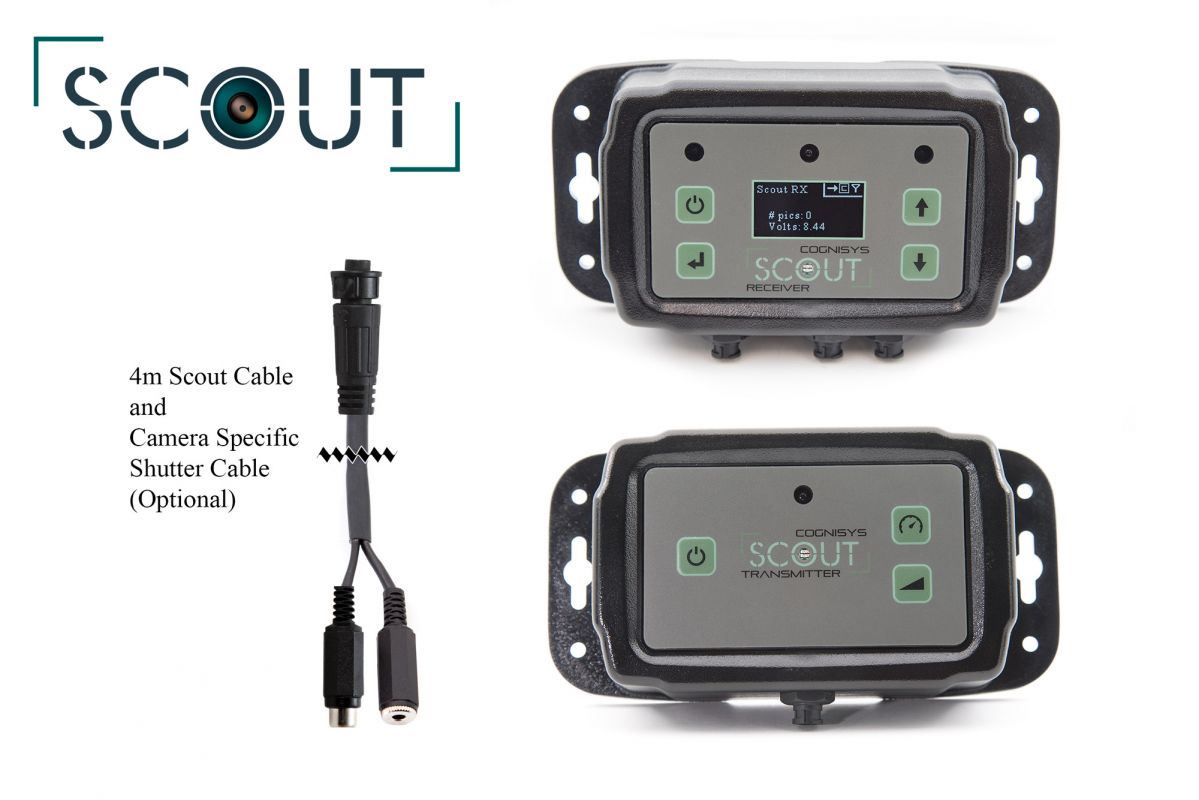
Camera trapping provides an opportunity to photograph intimate wildlife moments that are very difficult or impossible to capture with any other means - the image below is a great example. We put this page together to show one option of how to capture images like this. The goal of this page is to do a walk through of the equipment needed to set up a complete Scout based Camera Trap. We will be documenting an actual camera trap that was set up in California to capture mountain lions. In addition to the equipment used we will also cover all of the configuration settings for this camera trap. In this setup we will use two camera boxes - one for a Canon DSLR, taking still photographs with flash for illumination and the other will house a Sony mirror-less camera to take 4k video. The illumination for the video will be two battery powered LED banks. Both camera boxes will be triggered from the same Scout Beam Sensor. Note the lack of wires - the only wire in the entire setup is to connect the microphone to the video camera box - this setup is completely wireless!
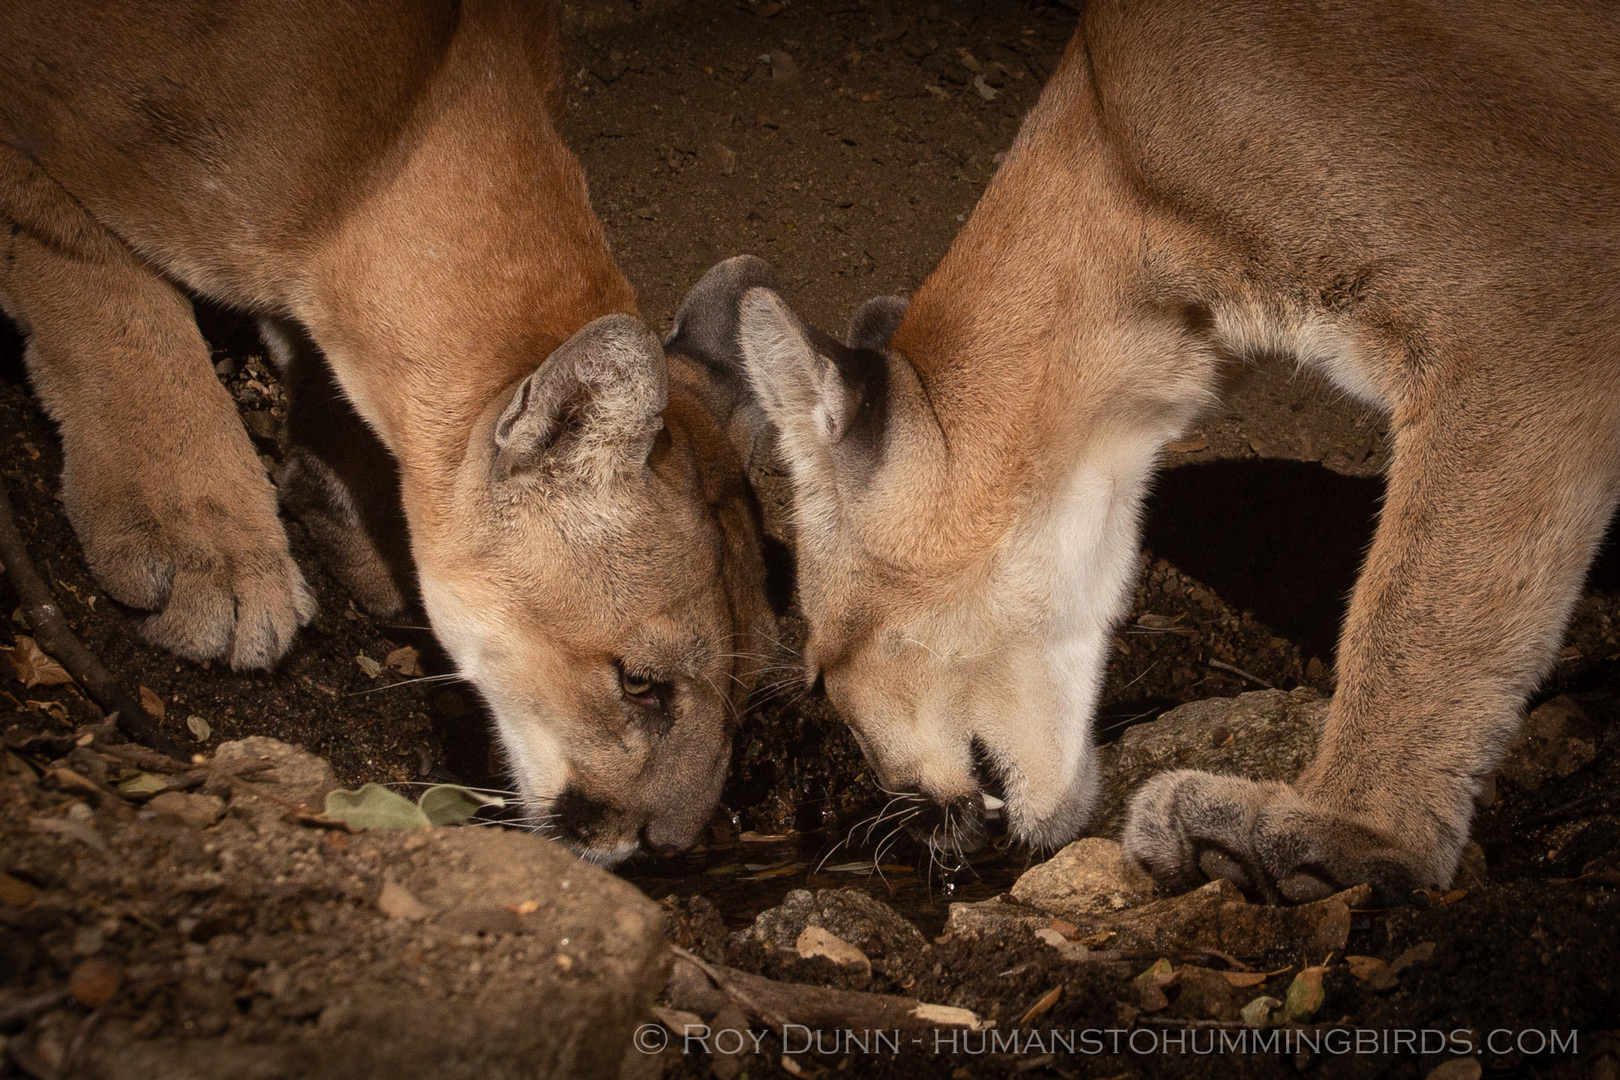
This above image, captured by Roy Dunn, is situated at a natural spring, toward the top of a mountain in the Antelope Valley, Southern California. Water springs, especially in summer, attract all kinds of wildlife and are thus great spots for camera traps. Secondly, pools of water created by the spring offer animals a good long drink, so they tend to hang around for a while. This affords us some real opportunity for great images and footage - both made possible with the Scout, as was used here.
An Overview of the Camera Trap
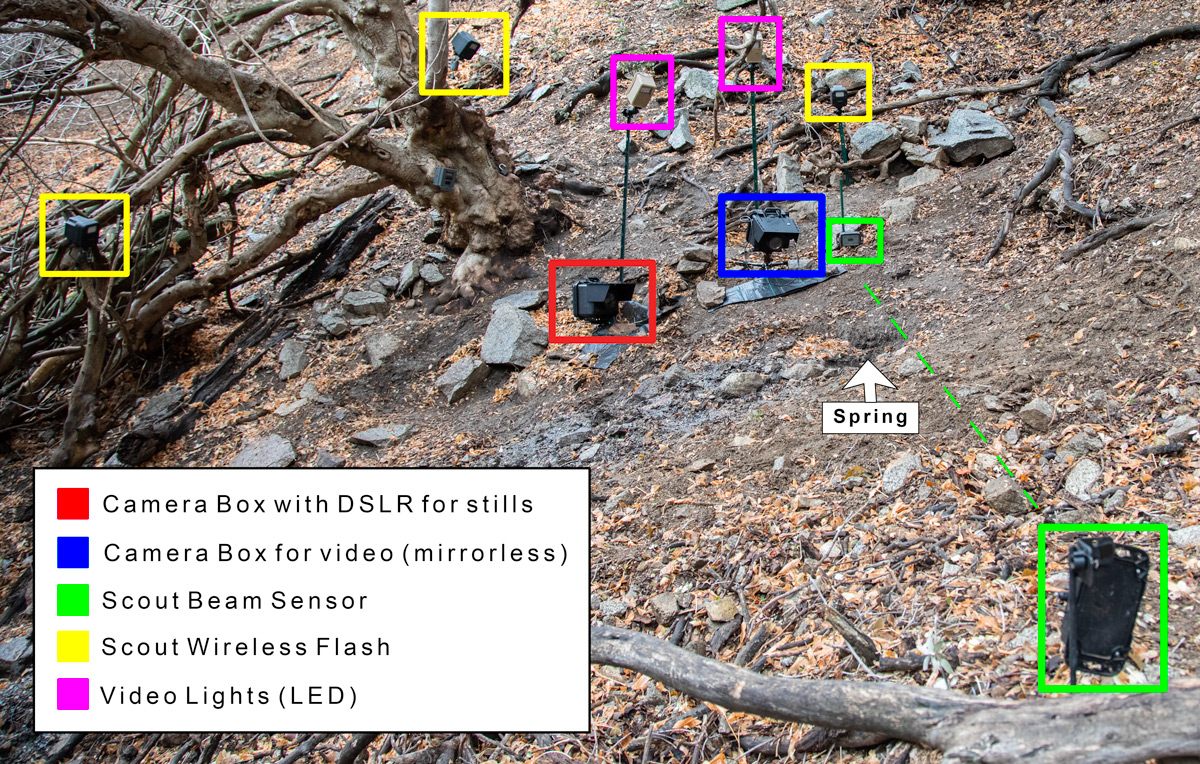
Notes on Component Placement
Scout Beam Sensor: Being completely wireless, the Scout offers total flexibility with the placement of the transmitter and receiver. Adjust the height of the beam according to your subject. For larger mammals such as mountain lions, a beam that is 12-15" above the ground will ensure they are captured, but will minimize the occurrence of squirrels and rats triggering the system wastefully. It is disheartening to check a camera to find 2850 images of a playful squirrel...!
Alignment of the beam is important and simple: Switch on the LED alignment feature of the Scout to best centralize the receiver within the emitted beam of the transmitter. Once the LED indicates alignment, center the beam by panning left and right to find the edges of the beam, then lock the transmitter down as close as possible to the center of the beam, repeat the procedure with tilt. This immunizes the Scout from any radical changes in ambient light or weather conditions. Third, it is good practice to minimize the opportunity for sunlight to shine directly into the receiver. Simple, if this occurs, swap ends with the transmitter! (Direct sun into the small receiver window can sometimes cause 'sensor blindness' and should be minimized. Incident sunlight is fine, just avoid pointing the receiver directly at the evening or morning sun, where it might shine straight in).
Light (Flash and Video lights):A common flaw of many camera trap images is that the lighting looks very unnatural. This is usually because lights or flashes are placed close to ground level. Get them high! Most light sources come from high above; the sun, the moon, streetlights. The main (key) light sources should be as high as possible, so we can replicate what the sun or the moon would do. Use trees, stakes, poles - whatever you can find. Here is where the Cognisys light sources stand head and shoulders above anything else in the market; Even if you put them up high out of reach, you can still easily make any output adjustments you need from ground level - from your phone!! What's more, a single battery will last at least several months. Nothing else can boast that. Coming back to setups, don't forget to illuminate the background to add both context and interest.
Pro tips:
Get yourself in the position of the subject and look at each of the light sources in turn, to make sure they are pointed where you need them.
Use small ball heads to mount the flashes/lights. Here, we are using small RC2 quick release ball heads. They enable a click-in, click-out convenience, such that it is easy to replace batteries and not have to go through realignment. These same considerations can be applied to the video flights as well as the flashes.
Camera: Camera: The Cognisys Scout Camera Trap system enables you to use the DSLR or Mirrorless camera of your choice. In the setup above, a Canon 6D is employed for stills, and a Sony A7SII for video. Lens choice is again, entirely up to you - the Scout Camera Box has several lengths of protective lens tube available, so you can shoot wide or long. Your choice. Camera trapping affords us an opportunity to capture images of animals in context by shooting wide, or very intimate closeups by shooting longer focal lengths. Cognisys places no constraints on the artistic requirements of the photographer.
Pro Tips:
Placing the camera box at eye level with the subject almost always provides images with much greater impact.
In doing so, the lens and lens filter are near the ground. Take precautions, such as a mat below the lens, so that rain does not create muddy droplets of water on the lens/filter - it can be heartbreaking....
Other General Setup Considerations and Tips
- Camera traps usually have to deal with inclement weather. Be prepared for it. Weatherproofing is essential, whatever system you employ. Mud and dirt get everywhere. Truly. Buy or build a system that can deal with it.
- Never underestimate how long it takes to set things up and get them right. It will still take longer than you think. When you think you have everything just right, almost certainly the first animal that gets photographed will still prove you wrong.
- Camera trap gear is heavy - mainly because of batteries. Be prepared to make several trips to your site, or use friends/assistants to help you. They can be a huge help in setting things up too.
- Mounting cameras, triggers, lights and flashes. Every single setup is different. Be prepared to employ straps, stakes, bungee cords, clamps, ball heads, quick-release clamps, spring clamps, zip ties, poles, fences, gateposts, trees, rocks, branches, sand and yes, duct tape. Whatever it takes.
- Security. No matter what you do to protect/secure your gear, if someone is determined enough, they will either steal it or break it. Deterrents we use are padlocks and Python cables, chains and steel cables and security boxes. Consider putting up a sign that mentions your gear has GPS tracking devices in it. Most people respect your gear, but some do not.
- Buy larger memory cards than you think you will need. Even well placed beam sensors can be triggered by rats, flocks of quail, deer, rats, moths (if you are using high sensitivity), and they eat up card space. Missing a shot because of a full memory card is heartbreaking.
- Consider setting up an integrated trail camera for reconnaissance to monitor your setup. This will shoot stills or videos of much lower quality, but will show you exactly what is going on when an animal triggers your main camera trap.
- Some great new technology now has cellphone based integrated trail cameras. If there is cell signal at your camera trap site, these will relay a thumbnail image of any activity right to your phone, so you can see whether it is worth coming to check your setup. We have used Spypoint Link-EVO trail cameras with great success for this purpose.
What Happens When
- Subject triggers Scout Beam Sensor by interrupting beam.
- Both Scout Camera Boxes start to execute their shutter and aux programs.
- Video Camera Box sends half press shutter signal to wake the Sony camera.
- After a delay of 3 seconds to allow the Sony to wake up a start video command is sent.
- Video Camera Box turns on Aux 1 to turn on video lights. This allows us to see the lights come on in the video.
- After a six second delay the stills camera box takes an image.
- Another six seconds later the stills camera box takes another image.
- After 15 seconds the video stop signal is sent to the Sony camera.
- The system is forced into an idle state to allow the Sony video camera to sleep.
Notice there is no mention of wakeup for the three flashes connected to the camera taking the stills. This is due to the Cognisys Scout Flashes always being ready - there is no wake-up time required. They will correctly expose the image on the first shot. There is no other flash available that has this capability after being in sleep mode. This is an extremely useful feature when your subject is on the move down a trail.
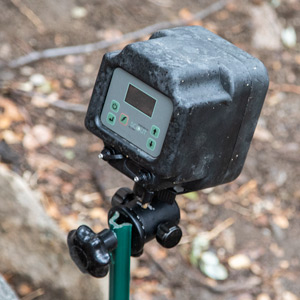
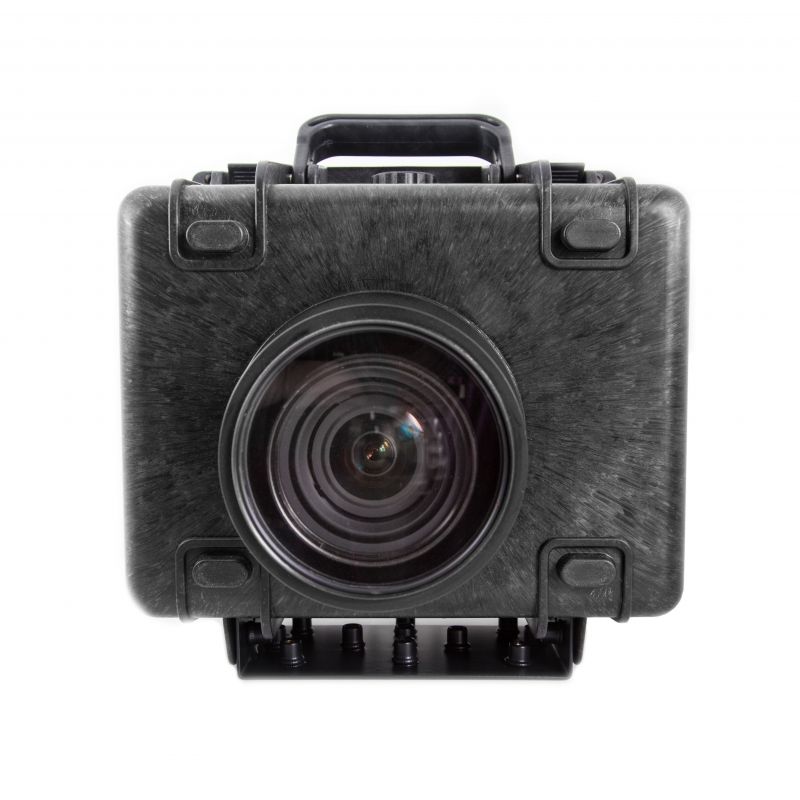
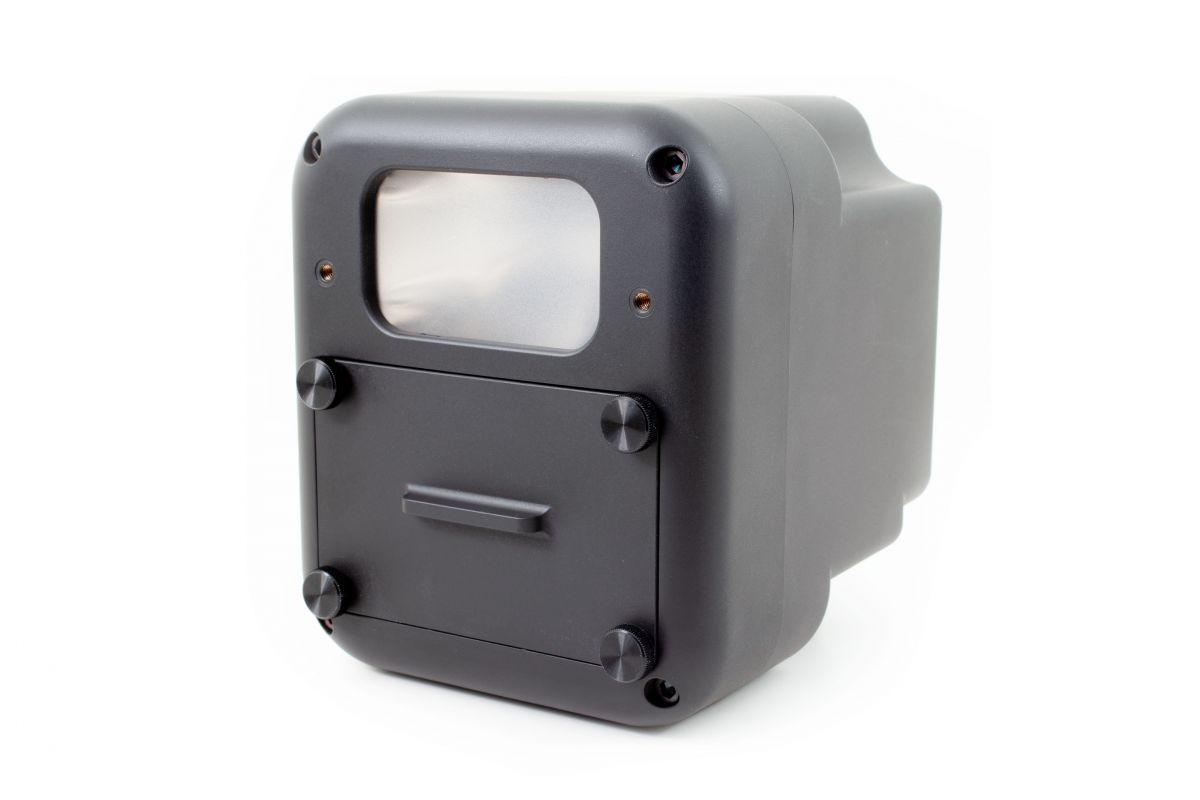
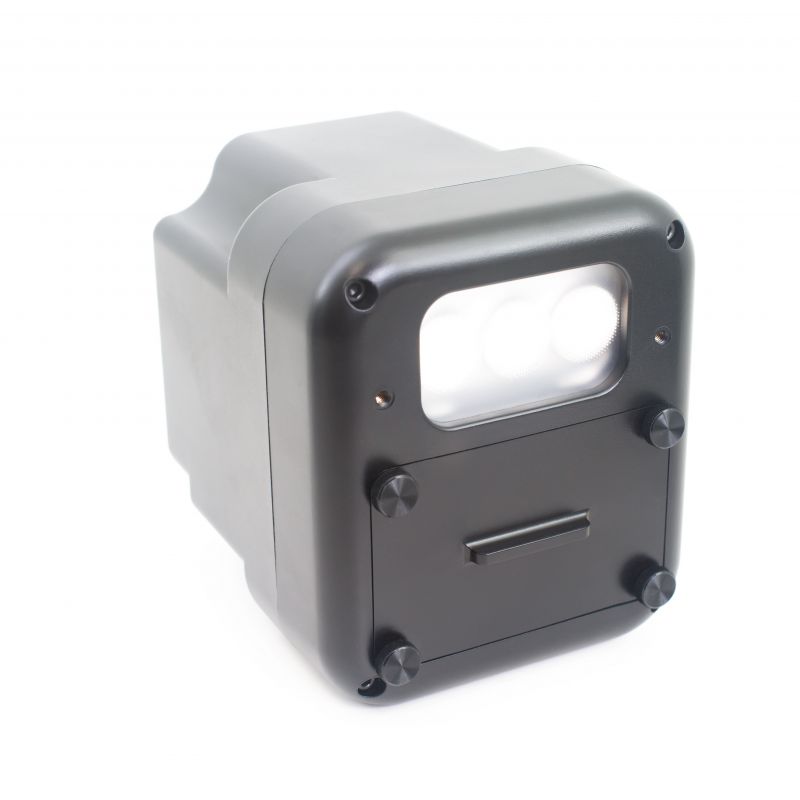
What's Inside the Camera Boxes
Inside the DSLR Box
This box contains a Canon 6D with a 17-40 mm lens. There are two connections from the Scout camera controller to the camera - the first is the shutter interface cable and the second is from the PC sync connection on the camera to the camera box, it provides the synchronization of the external flashes.
Inside the Video Box
This box contains a Sony a7RII with a 50 mm prime lens. There is a Sony Video Switch as the interface between the Scout Camera Box and the Sony camera. This switch translates the shutter output signal from the camera box to USB commands the camera understands to start and stop video. The internal Aux connection is used to activate a wireless transmitter that controls the video lights. This same task can be accomplished with our Scout Aux Box.
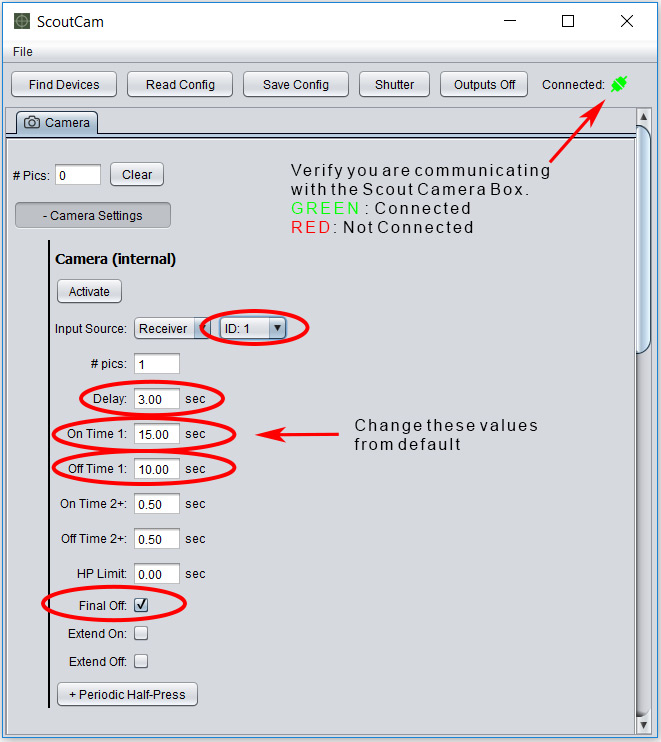
The screen shots below are from our free PC application - if you are using one of the mobile apps for IOS or Android the Scout App will look different but will have the same settings. The settings are divided up into two sections - one for video and the other for stills.
Configure the Video Camera Box
Camera Settings
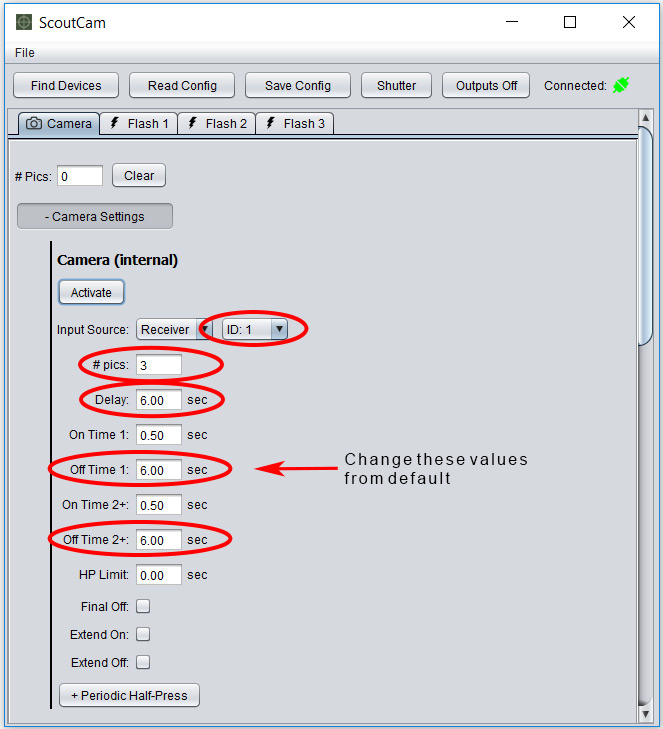
INPUT SOURCE: Set the Input Source to the device you want to trigger the camera. In this case we are using a Scout Receiver as the trigger for the camera so no change is needed. Set the ID to the ID you have set in your receiver - if you don't know you can use the "any" setting here.
DELAY: Delay adds time between when the half press and full press signals are sent to the camera. In this case we want the 1/2 press sent as soon as the subject crosses the beam but we need to delay the full press signal until the camera is fully awake - in the case of the Sony A7RII three seconds is enough. Video recording will start as soon as the full press signal is sent.
ON TIME 1: This parameter controls the duration of the video. The Sony A7RII is connected to the Scout Camera Box through our Sony Video Switch. The Sony Video Switch converts the on/off signals from the Scout Camera Box to video start/stop commands. Sony cameras do not have start video or stop video commands but only a toggle the video record mode. As long as the shutter line is active the camera will continue to record video.
OFF TIME: In order to prevent the Sony camera video recording from getting out of sync with the camera box it is necessary to make certain the camera is in the same state for each activation. If we don't do this and the camera gets out of sync we will continuously record video and fill up the memory card and empty the batteries. This off time prevents any more activations of the shutter until the 10 seconds elapses. 10 seconds is long enough for the Sony to go back to sleep. For this to work the power off time of the camera must be set to 5 seconds.
FINAL OFF: This check box tells the camera controller to use the final off time even if we only have one shutter activation. This is required to keep the video recording of the camera in sync with the camera box.
Aux Settings - Control the Lights via the AUX Box
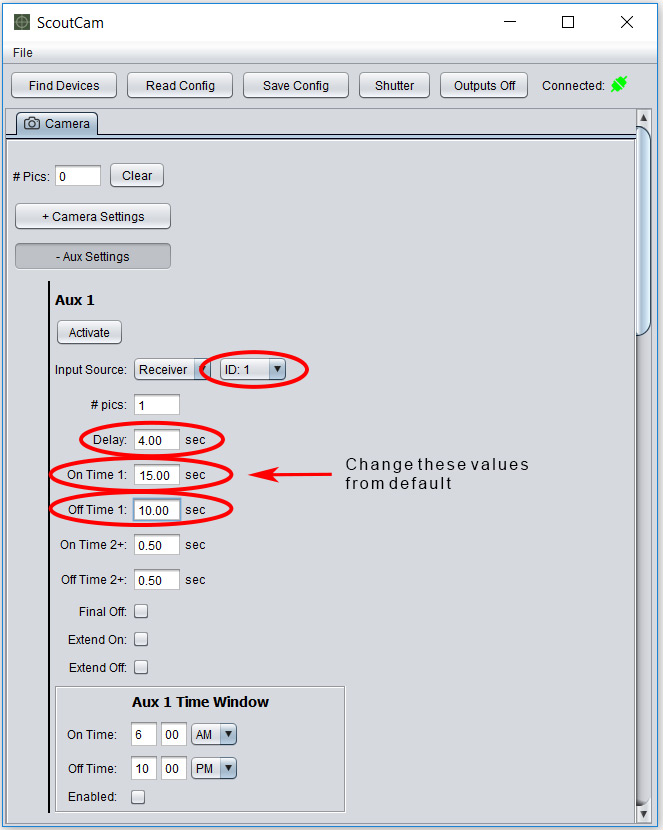
INPUT SOURCE: Set the Input Source to the sensor you want to use to turn on the lights. This does not need to be the same source that triggers the camera, it can be a different beam sensor or even a PIR sensor depending on the application. In this case however we want to use the same sensor that will trigger the camera. As with the camera settings - set the ID to the ID you have set in your receiver - if you don't know you can use the "any" setting here.
DELAY: This setting will prevent the light from turning on for four seconds. Since we are new to using this camera for video we wanted to see the lights come on while the video was recording. Four seconds of delay here will give us 1 second of video before the lights are turned on.
ON TIME 1: This setting will control how long the lights are on. Once the delay time expires this timer starts. In this case the lights will be on for 15 seconds.
OFF TIME: Once the lights are turned off we don't want them to turn back on until the camera is ready to record another video. Using an off time for the lights prevents them from turning on until the 10 seconds has elapsed.
FINAL OFF: This check box tells the camera controller to use the final off time even if we only have one shutter activation. This is required to so the camera controller will use the off time setting.
AUX 1 TIME WINDOW: For this setup we are going to use a time window but we will enter it into the global settings - see below. The Aux Time Window can be used if you want the time window for the Aux Outputs to be different than what you are using in the global time settings. The global time settings always have priority. In this case we want the lights to be active the entire time the camera is active so we will not change or enable this time window.
Time Settings - Record Video only when the lions are active
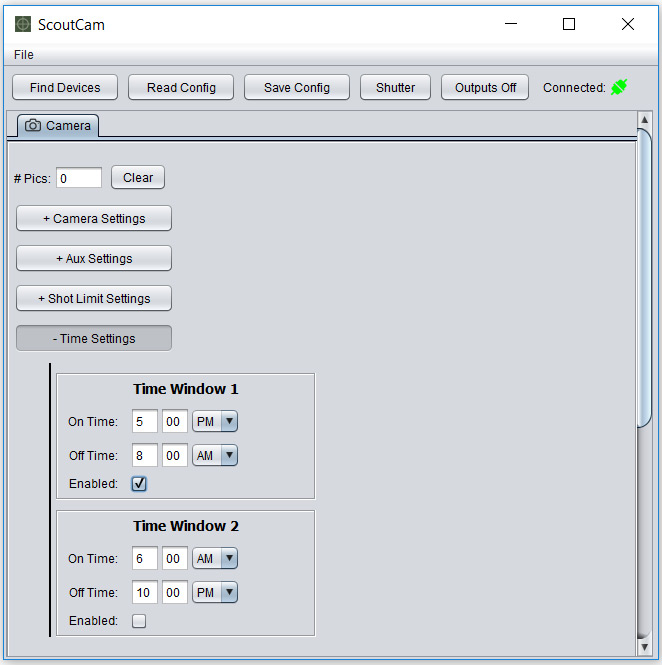
TIME WINDOW 1: Since this camera trap is set up over a natural spring, there are tons of other critters visiting during the day that we do not want to photograph or record video of. Lots of foxes, squirrels, skunks, deer and birds. We have set the global window time to only capture videos from dusk until dawn. The time settings entered here are global and have the highest priority. Don't forget to check the box to enable it.
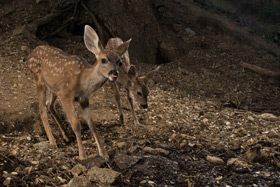
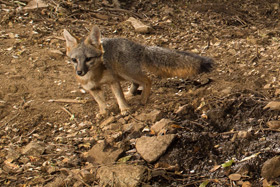
Other Critters that Visit the Spring

Configure the Stills Camera Box
Camera Settings
INPUT SOURCE: Since we are using the same sensor for both camera boxes this setting is the same as it is for the camera box shooting the video. Set the Input Source to the device you want to trigger the camera. In this case we are using a Scout Receiver as the trigger for the camera so no change is needed. Set the ID to the ID you have set in your receiver - if you don't know you can use the "any" setting here.
# PICS: Each time the beam is broken we want to take 3 images each six seconds apart.
DELAY: Delay adds time between when the half press and full press signals are sent to the camera. In this case we want the 1/2 press sent as soon as the subject crosses the beam (waking up the camera) but we want to delay the full press signal for six seconds. Setting the delay to six seconds will allow us to watch the video recorded by the other box and determine if there is any reaction from the subject due to the flashes.
ON TIME 1, ON TIME2+ The default setting for the on time is a half second, this doesn't need to be changed for the Canon 6D being used to capture the still images.
OFF TIME 1: This is the delay between the first and second images.
OFF TIME 2: This will be the delay between the second and third images.
Flash Settings
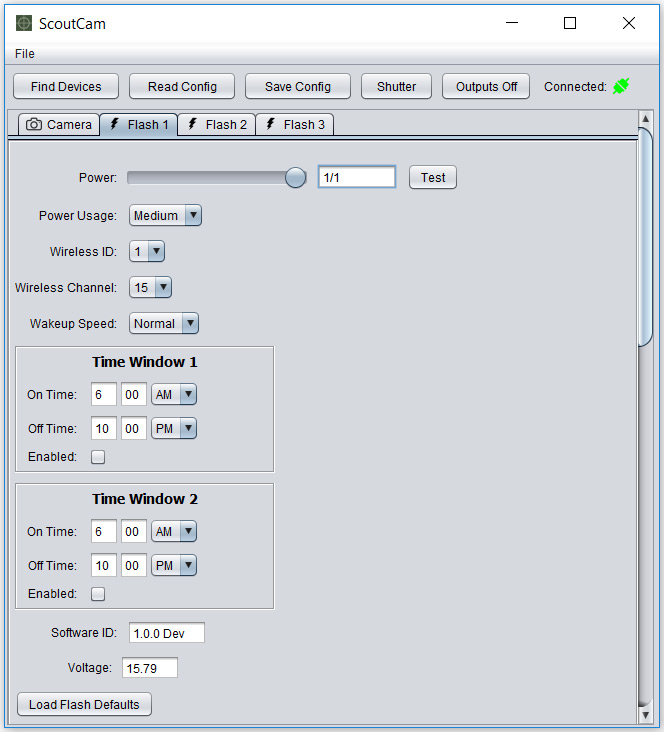
POWER: This setting controls the flash output power. The power of all of the flashes can be adjusted right from the mobile application making adjustments to the flashes mounted up in the trees much easier. The flashes can also be test fired to you can verify you are making adjustments to the right flash.
POWER USAGE: The Cognisys Scout flash can be configured for different levels of sleep, or power usage. Medium will ensure the flash capacitors will remain charged enough to always give you the commanded power level in the time it takes your camera to wake up. With these flashes having to burn time to wait for a flash to recharge is a thing of the past.
WIRELESS ID: Each flash in the system should be set to a unique ID. This ensures the flash settings will be sent and confirmed for each flash. In this case we have 3 flashes in the system - they are set to ID:1, ID:2 and ID:3. Each flash has its own tab so power can be set on a flash by flash basis.
WIRELESS CHANNEL: All of the devices set to the same wireless channel will be on the same "network" and controlled by the same camera box. In this case all 3 flashes are set to Wireless Channel: 15. If you had two camera boxes that each had 3 flashes you would want to set the 3 flashes to go to the first camera box to one channel. The other 3 flashes would be set to a separate channel. This would prevent one box from setting off the flashes from another camera box. If possible use wireless channels that are not right next to each other, for example use wireless channels 7 and 15 instead of channels 14 and 15.
Acknowledgments
Many thanks to Roy Dunn (humanstohummingbirds.com) and Johanna Turner (www.cougarmagic.com) for making this article possible. Roy and Johanna do a ton of work on the conservation of the mountain lion in southern California - including using their images of mountain lions to help raise money for the wildlife overpass there. They were kind enough to give me the tour and let me photograph their camera traps and publish many of the tricks that make them successful camera trappers.
As low as $589.00
As low as $499.00
As low as $439.00